How to Build a Bed that Folds into the Wall
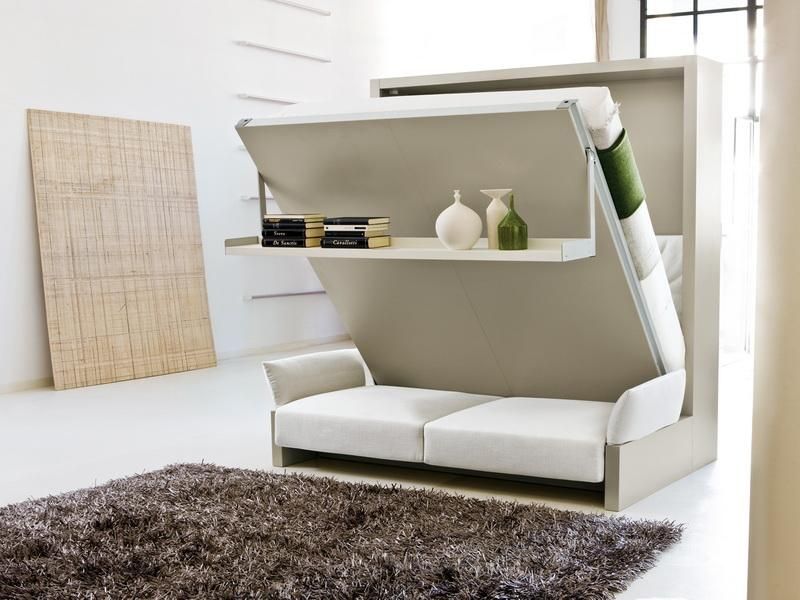
In this post, we will talk about how to build a bed that folds into the wall, or what is commonly known as the Murphy bed. Now, whether you choose to call them Murphy beds or wall beds, there are three (3) key components to build them. The lift mechanism, the bed frame, and the cabinet. There are also 2 main types of lift mechanisms, the spring type, and the piston type. Both mechanisms operate under a similar principle, they create the force that lifts the bed into the closed position.
The force created by the spring or piston needs to be balanced so that the weight of the bed frame and mattress is enough to hold the bed down on the floor. Some spring mechanisms feature adjustable tension, but piston systems are commonly not adjustable.
Piston strengths differ and are matched to the style and size of bed that you’re building. The variable to be considered for it is the mattress weight. If you’re using a mattress that’s too light for the nonadjustable piston or spring system, the bed won’t stay down on the floor. In this case, you must add a small amount of weight under the mattress to keep it on the ground.
Now, the bed frame is the one that holds the mattress and it should fit into the cabinet. Mattress thickness here will be an issue. A typical installation doesn’t contain a box spring, and the mattress couldn’t be more than 12-inch thick.
How to Build a Bed that Folds into the Wall
For the construction of a wall bed, you will need basic hand tools – tape measure, hammer, clamps, etc. You will also need a table saw, or a cicular saw, and a drill/driver.
The construction process of wall beds isn’t that difficult. The biggest challenge, though, will be finding enough space to work. You’ll need a large, flat workspace – a full sheet of plywood would be the right side. The finished product is large so if you have a narrow hallway or stairway, consider making and finishing the parts in your workshop or garage. And then just assemble the bed in its designated room.
Cutting and finishing the large plywood pieces before assembly will take most of your time. You can use a table saw to cut the plywood, as well as a circular saw with a straight-edge guide. A tip: when you cut the plywood with a table saw, keep the good side of the plywood face down.
Cover all of the plywood edges that’ll be left exposed with heat-activated edge banding. Press the edge banding along the plywood edge with a hot household iron. Protect the face of the iron by covering it with aluminum foil. While the edge banding is still hot, press it down with a roller or scrap of wood. Allow it to cool for a few minutes and then trim off the excess with a knife, chisel or trimmer.
Fasten the bed hardware to see if it fits okay. Then remove it before sanding and applying the finish. After sanding, some choose to apply 3 coats of polyurethane for the finishing of the panels. This is because it makes it easier to work on the flat panels individually. Mask over or leave unfinished any areas where glue will be applied.
When the finish is dry, reattach the hardware and begin assembling the Murphy bed. The bed frame and rails are joined with simple butt joints fastened with glue and wood screws or nails. Drill countersinks and pilot holes for each screw. The last step would be to attach the face panels to the frame and rail assembly.
Installation
The installation of a wall bed and cabinet is the easiest part of the project. They are also the most important steps to ensure that the constructed bed is safe.
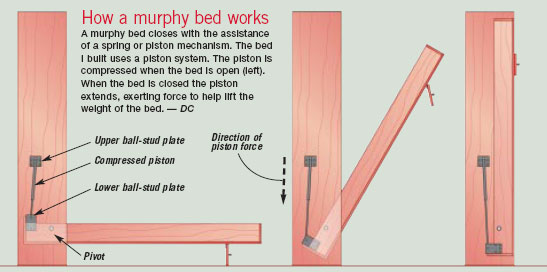
Finish assembling the cabinet and bed frame just a couple of feet away from the wall. Connect the pivot hardware attaching the headboard and cabinet top with wood screws. The final step is connecting the pistons to the ball-stud plates before securing the cabinet to the wall. The piston is labeled to show the correct installation orientation. Close the bed a few inches beyond vertical to snap the piston onto the ball-stud plates. If the piston doesn’t fit, double-check the ball-stud and pivot hardware locations and adjust them if necessary.
The cabinet must be fastened to the wall properly to ensure that it is safe. The lift mechanism of a Murphy bed is storing the energy that will be used to help lift the bed when it’s in the open position. If the cabinet isn’t secured, the lift mechanism could pull the cabinet away from the wall.
Of course, use the appropriate type and number of fasteners for the size of the bed you are building. Now, once the Murphy bed is secured to the wall, it’s ready to put in the mattress. The bed frame will be a little difficult to pull down without the mattress for weight. Call for help and assistance to hold down the bed frame while you place the mattress. If the bed floats above the floor, more weight is needed under the mattress. A simple solution is to fasten a 2 x 4-ft. scrap of 3/4-in. medium-density fiberboard to the plywood panels under the mattress with 1-1/4-in. screws. Once the bed frame stays down on the floor, the bed is ready to use.